How to Remove Tape in Hair Extensions at Home with No Damage?
Tape in hair extensions offer a seamless, natural look — but removing them incorrectly can cause serious damage to your natural hair. Many people panic when they realize they have no idea where to start. The good news? With the right tools and technique, removing tape in hair extensions at home is completely manageable[^1].
Removing tape in hair extensions at home without damage is possible when you use a dedicated adhesive remover solution, work in small sectioned portions, and never pull or force the bonds apart. The process typically takes 30–60 minutes[^2] and involves applying remover, waiting 5–15 minutes, then gently separating the tape sandwich from your natural hair with a fine-tooth comb.
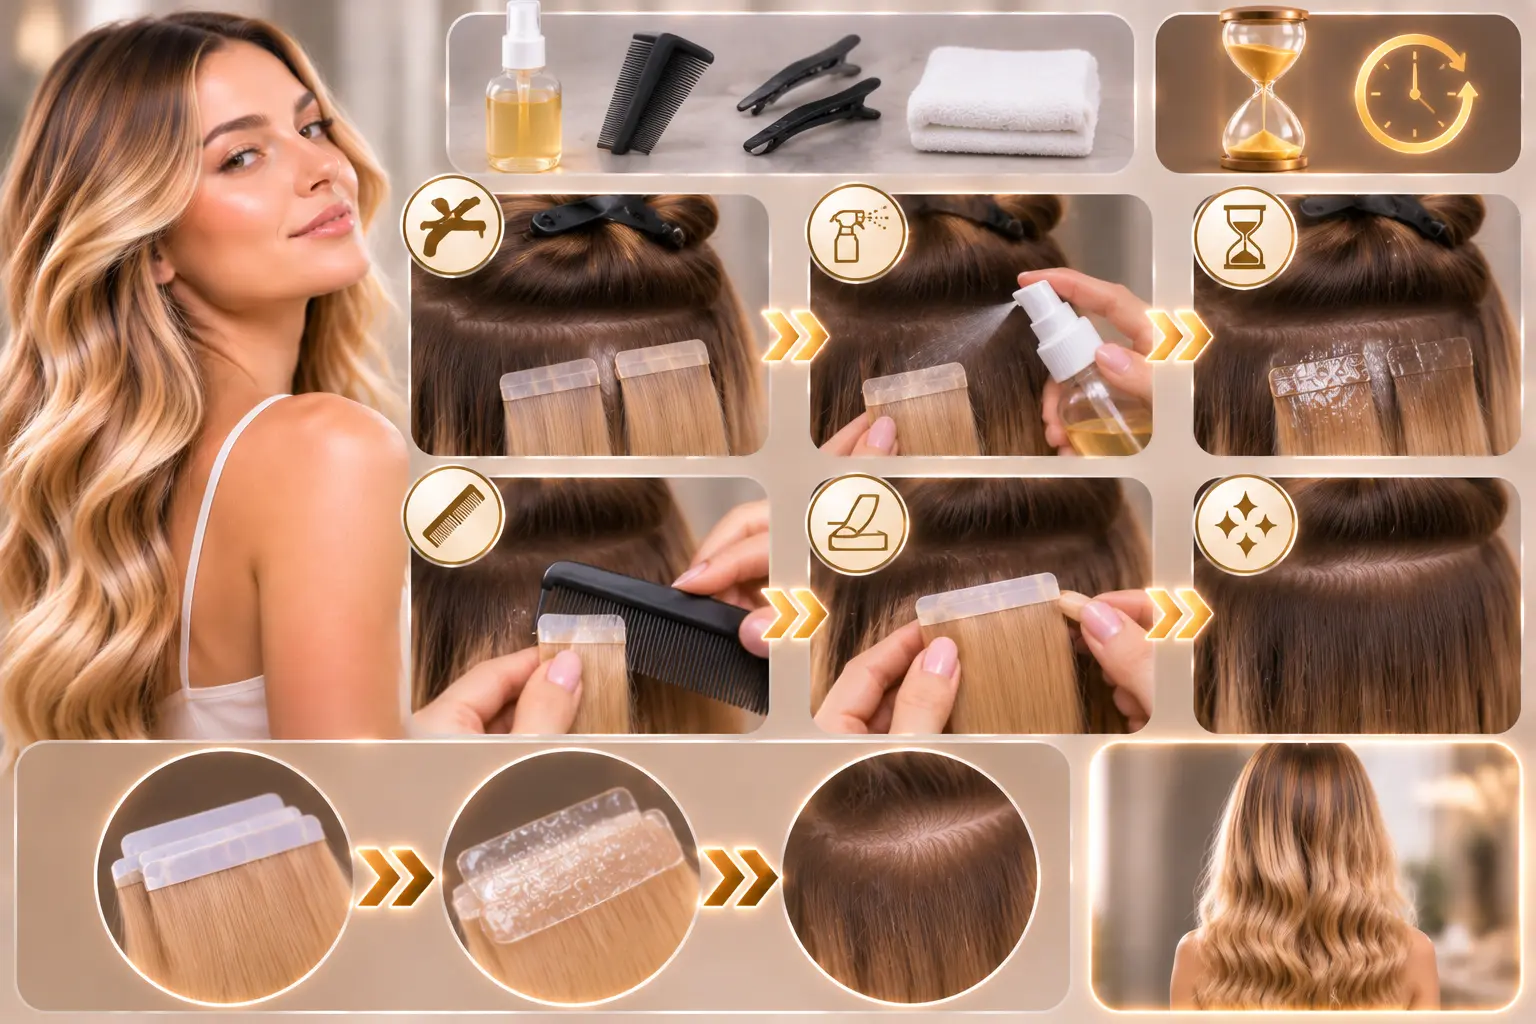
Understanding the full process — not just the basic steps — is what separates a clean, damage-free removal from a stressful, hair-snapping disaster. Below, I break down every stage in detail so you can approach this with complete confidence.
What Tools Do You Need to Remove Tape in Hair Extensions?
Walking into this process without the right supplies is the number one mistake I see. Using the wrong products — or improvising with household items — can leave adhesive residue in your hair or cause unnecessary breakage.
The correct tools make the difference between a smooth removal and a damaging experience. Having everything prepared before you start means you won't need to stop halfway through the process.
The Essential Removal Kit
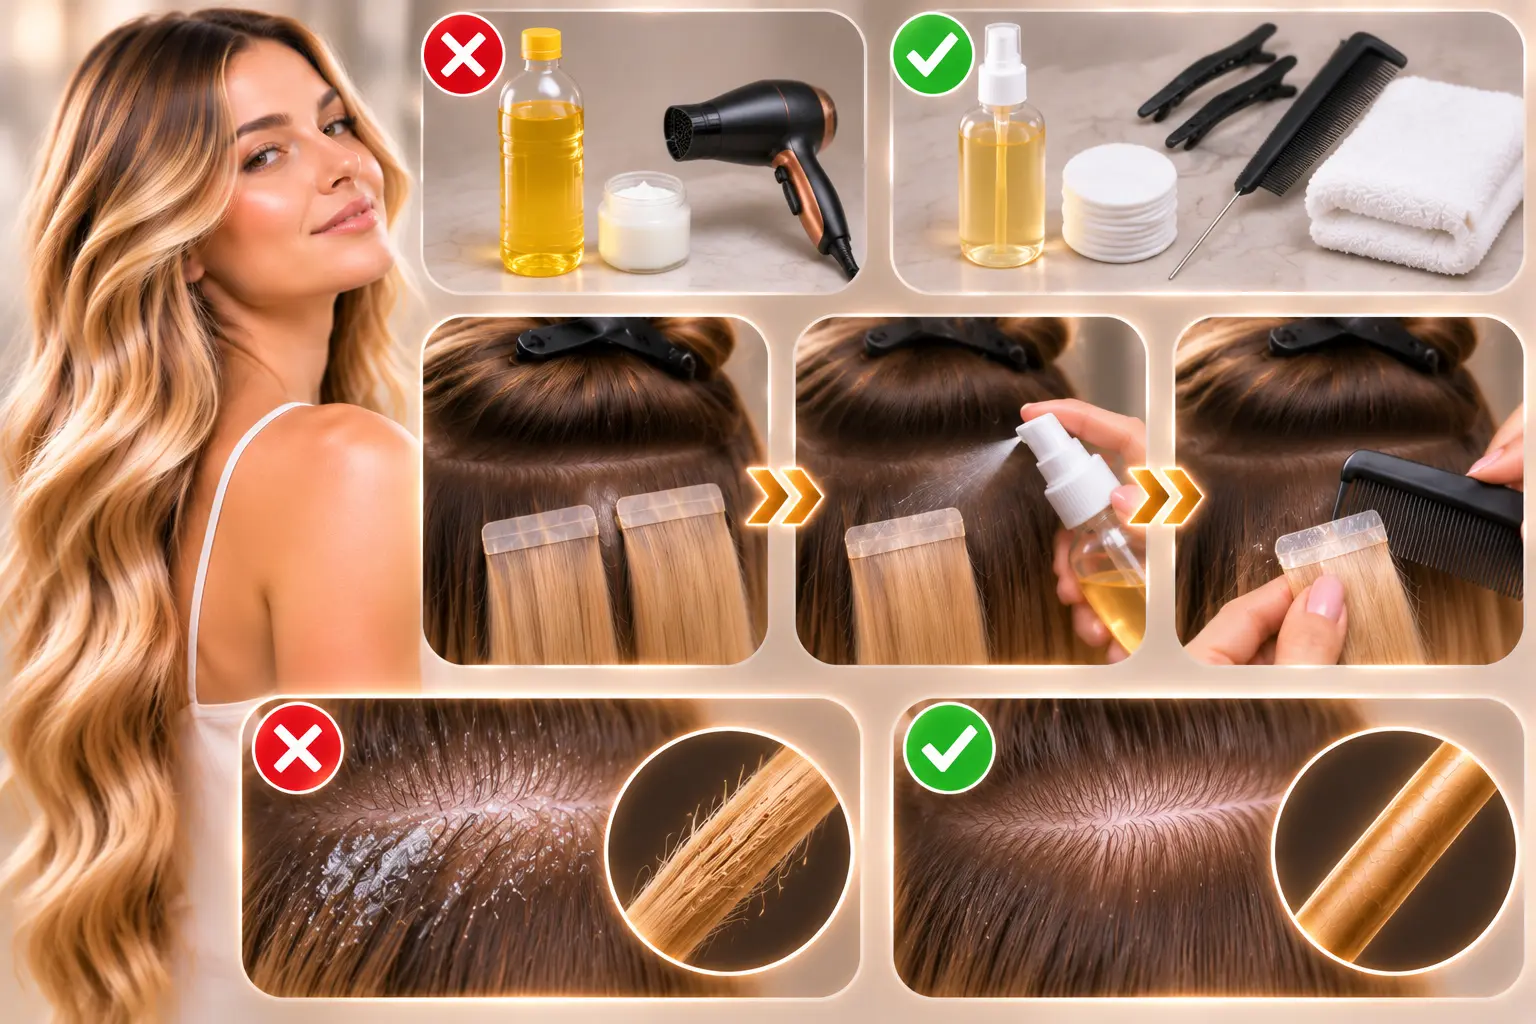
You only need four items for a proper at-home removal:
- Tape in hair extension remover solution — Available at most beauty supply stores or online. Look for products specifically formulated for hair extension adhesive. These are oil-based or alcohol-based formulas designed to break down the bond without stripping your hair.
- Fine-tooth comb — A rat-tail or pintail comb works best. The narrow teeth help you work through the bond zone with precision instead of dragging through large sections of hair.
- Hair clips — Standard sectioning clips allow you to isolate each tape weft cleanly. Working without sections leads to confusion and accidental tangling.
- Mild shampoo and conditioner — You will need to wash your hair after removal to clear any remaining solution or adhesive residue.
Why You Shouldn't Skip the Remover Solution
Some tutorials suggest using baby oil, coconut oil, or acetone as substitutes. I would caution against all three for different reasons:
- Baby oil and coconut oil can work in a pinch, but they take significantly longer and leave a heavy residue that is difficult to fully shampoo out.
- Acetone (nail polish remover) is far too harsh. It can dry out your natural hair and irritate your scalp badly.
A purpose-built tape extension remover is inexpensive and specifically pH-balanced for use near the scalp[^3]. It is always worth purchasing the correct product.
Pro tip: If you are buying tape in extensions from a professional manufacturer, ask whether they recommend a specific remover solution that is compatible with their adhesive formula. At RENAI HAIR, we use high-quality, heat-activated tape adhesive on our extensions — a dedicated remover solution will always deliver the cleanest result.
How Do You Section Your Hair Before Removing Tape Extensions?
Poor sectioning is responsible for more damage than almost any other removal mistake. If you are working blind — pulling at sections without a clear plan — you risk tangling multiple tape bonds together and making the process far more difficult.
Before you apply a single drop of remover, your sectioning strategy determines how smoothly everything goes. It takes an extra five minutes but saves you from a significant amount of frustration.
Step-by-Step Sectioning Method
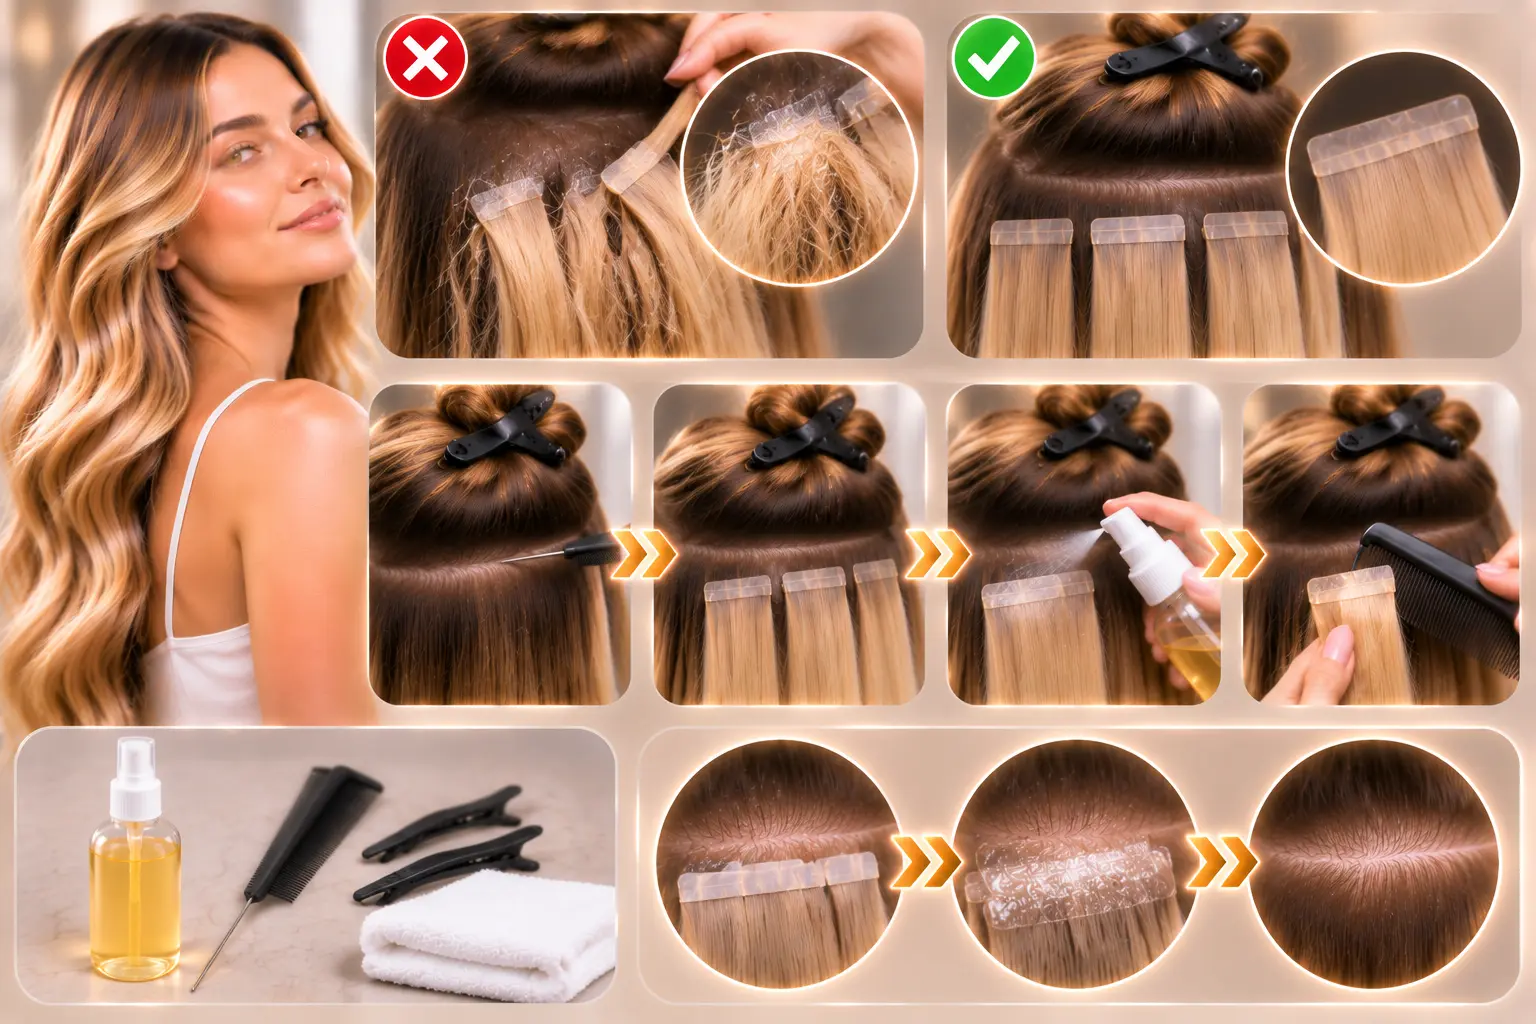
Follow this process before touching any adhesive:
- Start with dry, detangled hair. Wet hair is more fragile[^4]. Removing extensions on dry hair gives you better visibility and control.
- Part your hair horizontally at the nape of the neck. Clip everything above this line out of the way.
- Identify the first row of tape wefts. You should be able to feel or see the flat tape bonds where two sandwiched sections meet.
- Isolate each tape bond individually before applying remover. Do not try to remove multiple bonds at the same time.
- Work from the bottom row upward. Removing the lowest row first prevents disturbed bonds from tangling with rows above[^5].
This bottom-up approach mirrors the professional method used in salons. It keeps each section clean and accessible throughout the process.
How Do You Apply the Remover Solution Correctly?
Applying the remover solution sounds simple, but technique matters. Too little and the adhesive won't release fully. Too much and you risk saturating your scalp or dripping solution onto sections you haven't reached yet.
The goal is targeted, controlled application — enough to fully penetrate the tape bond without excess.
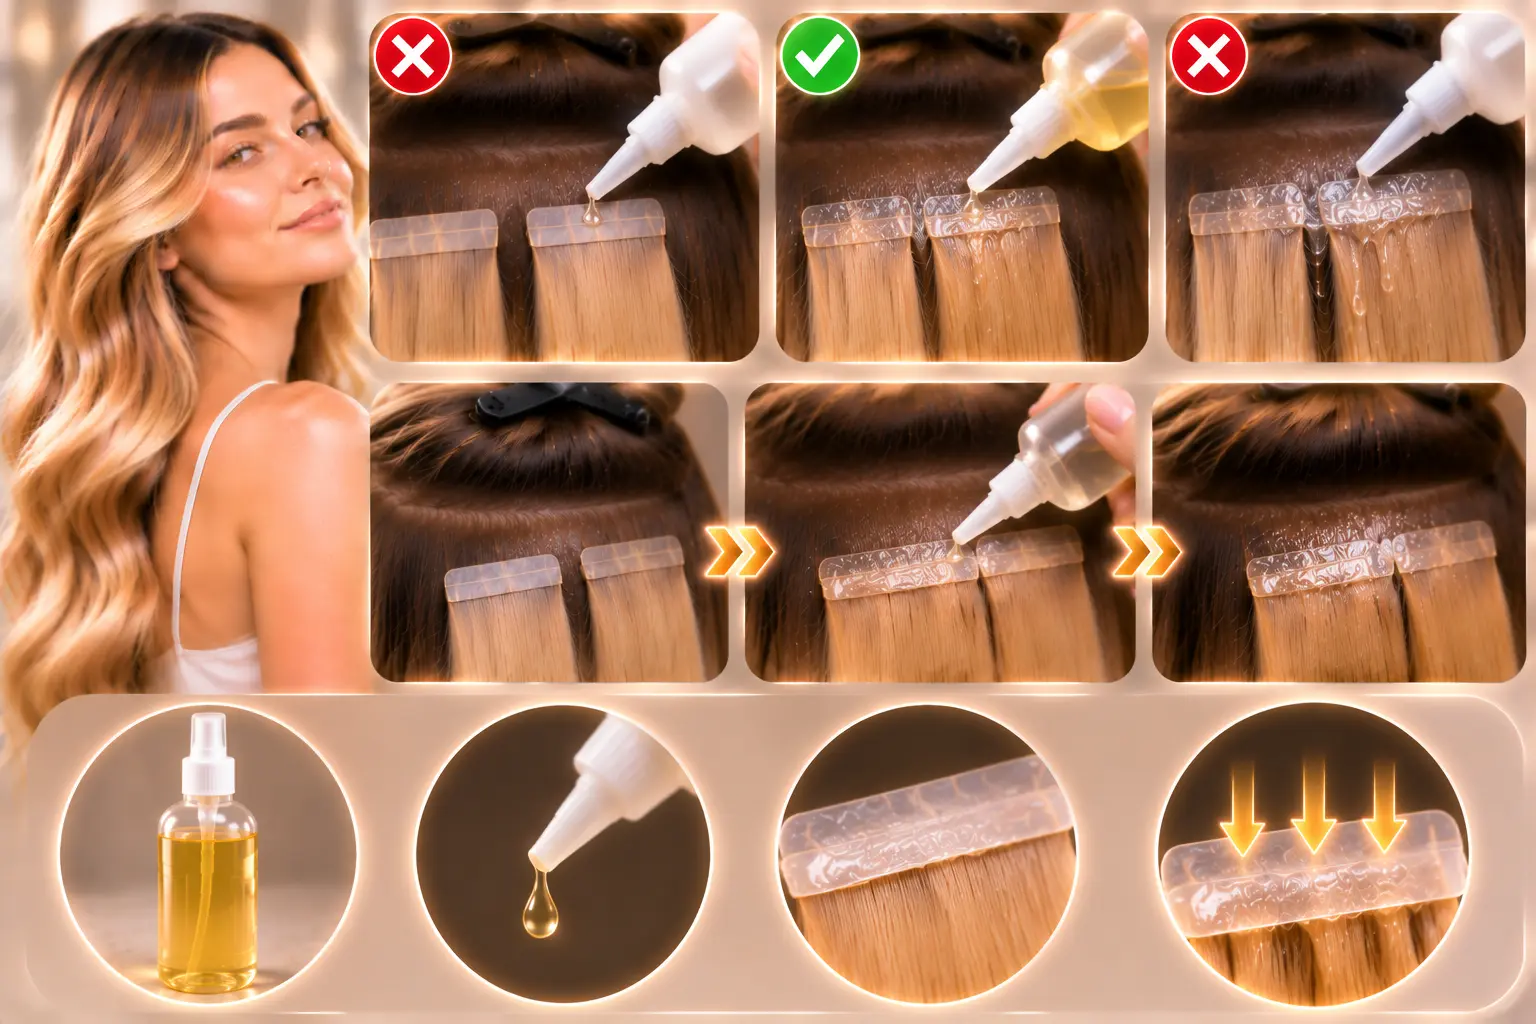
Application Process
Once your first section is isolated, follow these steps:
- Hold the tape bond flat between your fingers. This exposes the adhesive edges clearly.
- Apply the remover solution directly to the adhesive seam — the line where the two tape pieces meet your natural hair. Use the applicator tip, a cotton pad, or a small brush depending on your product's design.
- Use a small, controlled amount. You want to saturate the bond area, not flood it. A few drops applied precisely are more effective than a heavy soak.
- Do not rub or scrub. Press gently so the solution absorbs into the adhesive. Rubbing can work the adhesive further into your natural hair strands.
- Wait the recommended time — typically 5 to 15 minutes depending on the product. Check the specific instructions on your remover solution. Rushing this step is the most common cause of resistance when separating the bond.
Some bonds may need a second application if the adhesive is particularly strong or if the extensions have been in for an extended period (more than 6–8 weeks). This is completely normal. Patience here protects your hair.
How Do You Safely Separate and Remove the Tape Bonds?
This is the step where most damage occurs. People feel the bond loosening slightly and assume that means they can now pull the extension free. That assumption causes breakage.
Even when the remover has done its job, the separation still needs to be slow and deliberate. Your natural hair is sandwiched between two tape pieces, and those fibers need to be guided out — not yanked.
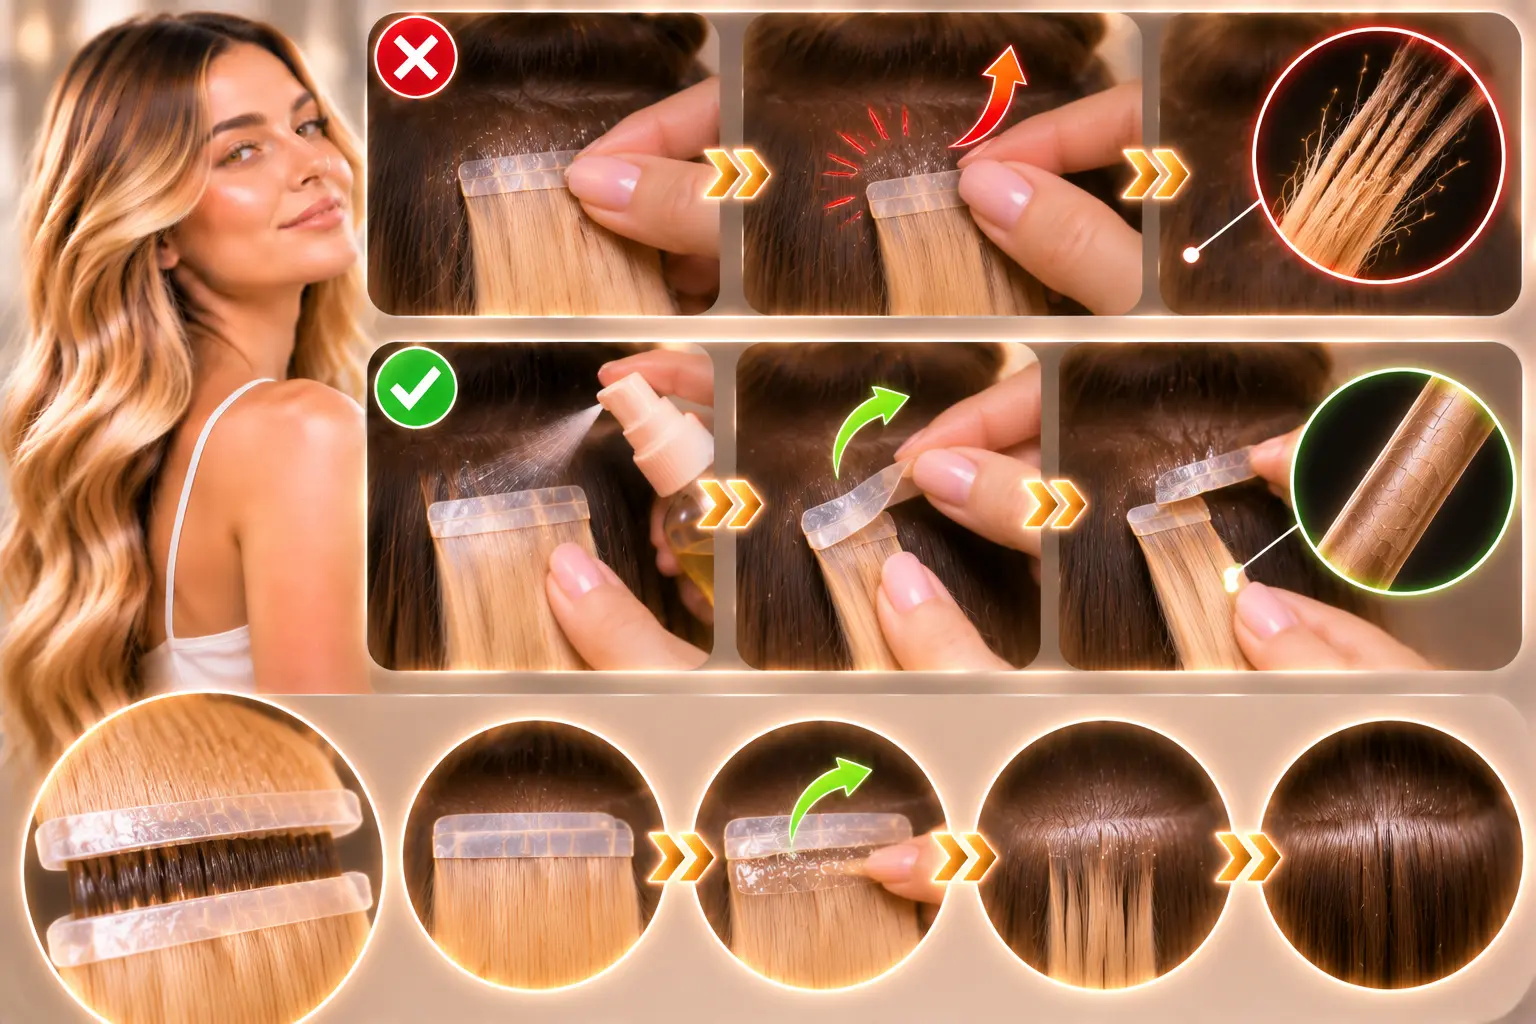
The Correct Separation Technique
After the remover has had time to work:
- Pinch the tape bond between your thumb and forefinger. Gently try to flex the tape — you should feel it start to give.
- Use your fine-tooth comb to work between the tape and your natural hair. Insert the comb teeth at the edge of the bond where the remover has penetrated.
- Slowly slide the comb along the length of the bond from the edge toward the hair root. This separates the tape from your natural strands without pulling them.
- Once the comb has created separation, peel the tape away slowly. Use a consistent, even pressure — never a sudden jerk.
- If you feel resistance at any point, stop immediately. Apply more remover solution, wait another 5 minutes, and try again. Resistance means the adhesive is still active. Forcing it causes breakage.
After the Bond Separates
- Run the fine-tooth comb gently through the freed section of your natural hair.
- Check for any residual adhesive still attached to your hair strands.
- If you find residue, apply a small amount of remover to that spot specifically and comb through carefully.
- Clip the freed section away from the remaining bonds before moving to the next one.
Repeat this full process for every tape bond, working row by row from the bottom of your head to the top.
How Do You Clean Your Hair After Removing Tape Extensions?
The removal process is only complete once your hair has been thoroughly cleansed. Adhesive remover solution — even professional-grade products — leaves a residue that must be washed out. Skipping this step can leave your hair feeling greasy or cause buildup over time.
A proper post-removal wash restores your natural hair to a clean baseline, ready for reinstallation or for a rest period.
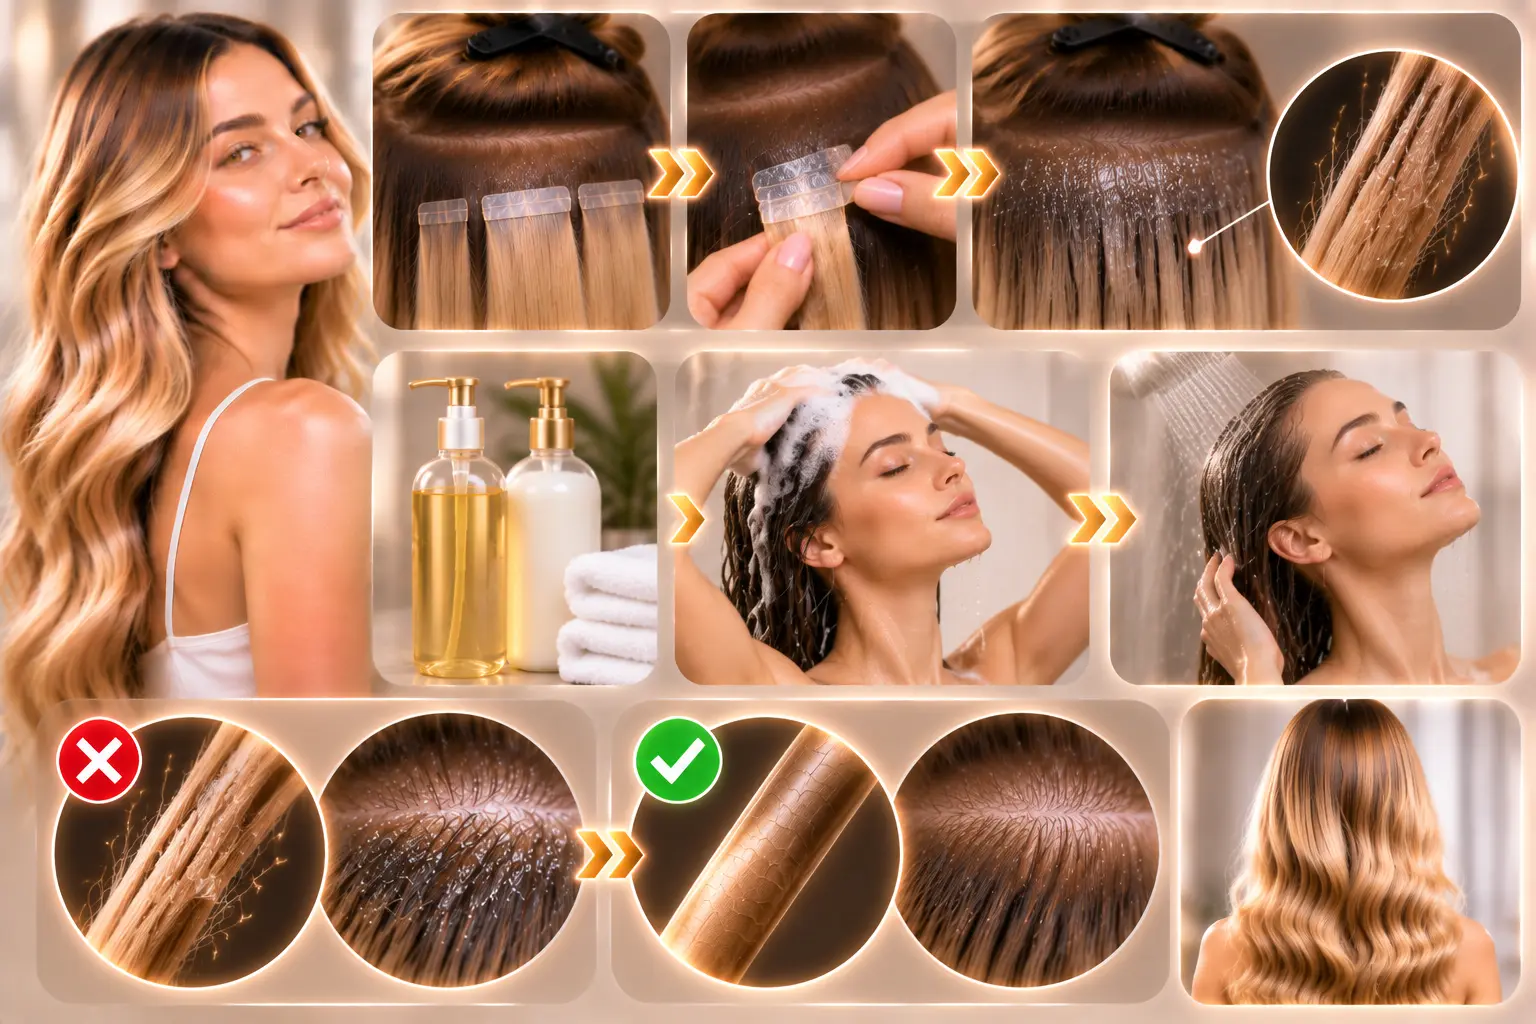
Post-Removal Wash Routine
Follow these steps for a complete cleanse:
- Rinse your hair thoroughly with warm water before applying shampoo. This removes the bulk of the remover solution.
- Apply a mild, sulfate-free shampoo and massage it gently into your scalp and through the lengths. Sulfate-free formulas cleanse without stripping natural oils that your hair needs after the removal process[^6].
- Rinse completely, then shampoo a second time. Two rounds of shampooing are usually necessary to fully clear adhesive remover residue.
- Apply a moisturizing conditioner from mid-lengths to ends. Leave it on for 2–3 minutes before rinsing.
- Inspect your hair while it is still wet. Run your fingers through each section. If you feel any sticky spots, apply a small amount of remover to that area, let it sit for a few minutes, then re-shampoo.
Your hair may feel slightly different immediately after removal — this is normal. A deep conditioning treatment once a week for the first two weeks after removal supports hair health and strength[^7].
Frequently Asked Questions
Can I remove tape in hair extensions without a remover solution?
You can use alternatives like baby oil or coconut oil, but purpose-built remover solutions work faster and more cleanly. Household oils leave heavy residue and require more shampoo washes to clear. Acetone should never be used — it is too harsh for scalp and hair health.
How long does it take to remove tape in hair extensions at home?
A full removal typically takes 30 to 60 minutes depending on how many rows of extensions you have and how long each bond takes to release. Working methodically and not rushing the remover's soak time keeps the process efficient and damage-free.
Will removing tape extensions damage my natural hair?
When done correctly — using a proper remover, sectioning carefully, and never forcing a bond — tape in extension removal causes minimal to no damage. Damage typically results from skipping remover solution, rushing the separation step, or attempting to pull bonds without adequate saturation[^8].
How often can I re-tape my hair extensions after removal?
Most stylists and manufacturers recommend giving your natural hair a 1–2 week rest between installation cycles, particularly if your scalp shows any sensitivity[^9]. High-quality tape in extensions from a reliable manufacturer, like those produced by RENAI HAIR, can often be re-taped and reused if the weft itself remains in good condition.
When should I go to a professional instead of removing them at home?
If you experience significant resistance that does not resolve with additional remover solution, notice unusual scalp sensitivity, or have had the extensions in longer than the recommended wear period, visit a professional stylist. Forcing a stubborn bond at home is never worth the risk of damage.
Conclusion
Removing tape in hair extensions at home without damage comes down to three principles: use the right tools, take your time, and never force a bond. Prepare your sectioning clips, remover solution, and fine-tooth comb before you start. Apply the remover precisely, wait the full recommended time, and separate each bond slowly. Finish with a thorough shampoo to clear all residue. If resistance persists at any stage, seek professional guidance rather than risk your natural hair.
At RENAI HAIR, our tape in hair extensions are manufactured with consistent, high-quality adhesive that responds well to standard professional-grade remover solutions. If you are a brand, distributor, or salon looking for reliable tape in extensions with stable quality and long wear performance, contact our team to discuss your product requirements.
[^1]: "Safe Removal of TAPE IN EXTENSIONS at home + Reusing Tips", https://www.youtube.com/watch?v=SsuwiTvpGmA. Studies on hair extension safety and removal practices suggest that damage outcomes are more closely associated with technique and product use than with the setting in which removal occurs, though professional supervision reduces the risk of user error. Evidence role: general_support; source type: research. Supports: That at-home hair extension removal, when performed with appropriate tools and technique, does not necessarily result in greater damage than professional removal. Scope note: Direct comparative studies on at-home versus professional tape extension removal are limited; most evidence is derived from broader hair extension safety literature. [^2]: "How to Safely Remove Tape-In Extensions", https://www.hairmadeeasi.com/en-us/blogs/hair-extension-blog/how-to-safely-remove-tape-in-extensions-without-damaging-your-hair?srsltid=AYCX9vI2ep_eVOdaDw2ER4Vlh5Zx5qkU7sR9coFir8vJlSUiCgafAUX9. Professional cosmetology training materials and salon industry guidelines generally indicate that tape-in extension removal requires between 30 and 60 minutes depending on the number of bonds and adhesive condition. Evidence role: general_support; source type: institution. Supports: That a full tape-in hair extension removal session requires approximately 30 to 60 minutes. Scope note: This time range is widely cited in practitioner contexts but is not derived from a controlled study; individual variation in extension quantity and adhesive strength may significantly affect duration. [^3]: "The Shampoo pH can Affect the Hair: Myth or Reality? - PMC", https://pmc.ncbi.nlm.nih.gov/articles/PMC4158629/. Cosmetic formulation guidelines establish that products applied near the scalp should maintain a pH between approximately 4.5 and 5.5 to align with the scalp's natural acid mantle and minimize cuticle disruption. Evidence role: mechanism; source type: research. Supports: That cosmetic products intended for scalp application are formulated within a pH range compatible with scalp skin and hair fiber integrity. Scope note: This citation supports the general principle of pH-balanced scalp products; it does not directly verify the pH specifications of any particular tape extension remover product line. [^4]: "Comparing hair tensile testing in the wet and the dry state - PMC", https://pmc.ncbi.nlm.nih.gov/articles/PMC9544838/. Trichological research demonstrates that water absorption causes the hair cortex to swell and reduces tensile strength by approximately 20–30%, making wet hair significantly more prone to breakage under mechanical stress than dry hair. Evidence role: mechanism; source type: research. Supports: That wet hair has reduced tensile strength and increased susceptibility to mechanical damage compared to dry hair. Scope note: The precise percentage reduction varies across studies depending on hair type, porosity, and chemical treatment history. [^5]: "Complete Guide to Hair Extensions: Types, Application ...", https://gotopjs.com/blog/complete-guide-to-hair-extensions-types-application-methods-and-professional-techniques/. Accredited cosmetology training curricula and professional extension certification programs consistently instruct technicians to begin removal at the nape and work upward, a sequence designed to maintain access to each bond row without disturbing adjacent sections. Evidence role: expert_consensus; source type: institution. Supports: That professional tape extension removal proceeds from the lowest row upward to prevent mechanical entanglement between bond rows. Scope note: This reflects practitioner consensus documented in training materials rather than findings from a controlled experimental study. [^6]: "Human and Environmental Toxicity of Sodium Lauryl Sulfate ...", https://pmc.ncbi.nlm.nih.gov/articles/PMC4651417/. Cosmetic dermatology research has shown that anionic surfactants such as sodium lauryl sulfate exhibit greater lipid-stripping activity on hair and scalp compared to gentler amphoteric or non-ionic surfactants commonly used in sulfate-free formulations. Evidence role: mechanism; source type: research. Supports: That sulfate-based surfactants remove more sebum and natural lipids from hair and scalp than milder sulfate-free alternatives. Scope note: The degree of lipid stripping varies with surfactant concentration, water temperature, and individual scalp sebum production; sulfate-free shampoos are not uniformly mild across all formulations. [^7]: "Hair and stress: A pilot study of hair and cytokine balance alteration ...", https://pmc.ncbi.nlm.nih.gov/articles/PMC5397031/. Hair science literature indicates that conditioning treatments containing humectants and film-forming agents can partially restore cuticle alignment and reduce breakage susceptibility in hair that has undergone mechanical or chemical stress. Evidence role: general_support; source type: research. Supports: That regular deep conditioning treatments following mechanical stress or adhesive exposure help restore hair fiber integrity and moisture balance. Scope note: The specific recommendation of once-weekly treatment for two weeks is a practitioner guideline rather than a finding from controlled clinical trials. [^8]: "Scalp Condition Impacts Hair Growth and Retention via ... - PMC", https://pmc.ncbi.nlm.nih.gov/articles/PMC6369642/. Trichological case reviews and hair extension safety literature identify premature mechanical traction on incompletely dissolved adhesive bonds as a leading cause of cortical fiber fracture and traction-related hair loss during extension removal procedures. Evidence role: mechanism; source type: research. Supports: That mechanical tension applied to hair fibers before adhesive bonds are adequately dissolved is a primary mechanism of breakage during extension removal. Scope note: Systematic clinical studies specifically isolating removal technique as a variable are sparse; much of the evidence is derived from case reports and practitioner-reported observations. [^9]: "Traction Alopecia - StatPearls - NCBI Bookshelf", https://www.ncbi.nlm.nih.gov/books/NBK470434/. Dermatological literature on traction alopecia and contact dermatitis notes that persistent scalp tenderness, erythema, or follicular inflammation associated with hair extensions are clinical indicators that warrant professional assessment to prevent irreversible follicular damage. Evidence role: expert_consensus; source type: research. Supports: That scalp sensitivity or pain associated with hair extensions may indicate traction stress or contact irritation warranting professional evaluation. Scope note: This citation supports the general principle of seeking professional evaluation for scalp symptoms; it does not establish a specific sensitivity threshold that distinguishes safe at-home continuation from cases requiring professional intervention.